You’re Out of Timer
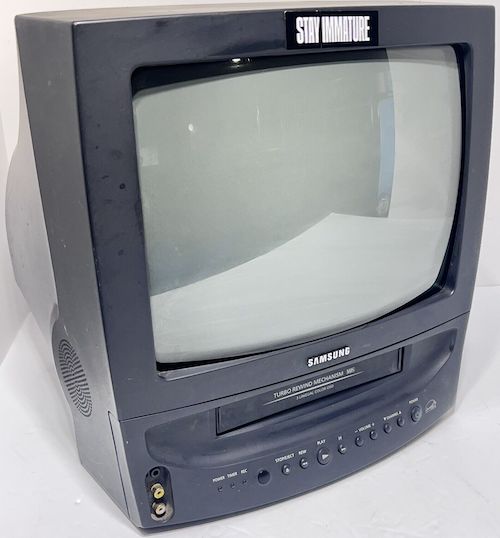
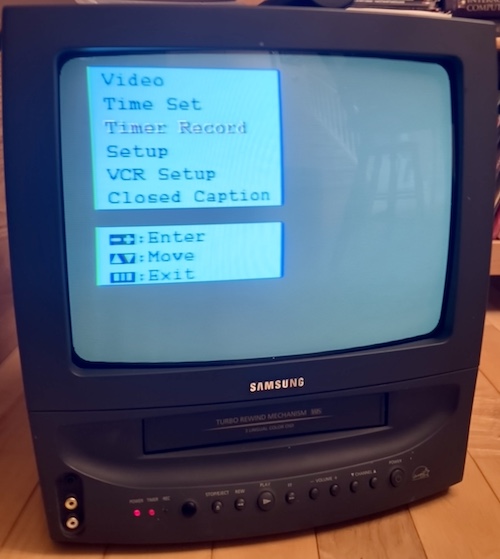
Now that there are more clubs forming in my local area, I’ve been thinking about taking some of my junk to shows. Of course, this means I’ll need a cheap small colour TV if anyone wants to see that junk work. Maybe something like this inexpensive 13” Samsung CXJ1352? Too bad it won’t stay running.
Hailing from a fee-encumbered auction on eBay, even with a best offer, I paid a little more than I wanted to. I did so, rather than picking up a working set from local Kijiji, because the problem described is mysterious:
Tv powers on with flashing timer light, The timer shows 0 minutes remaining and then the tv powers off shortly thereafter. We don’t have a remote and are not familiar enough with the unit to troubleshoot the matter so we’re selling the unit as is.
While the set was in transit, I was happy to find a service manual with a single web search. That service manual included a packing list, which told me that the original remote was Samsung part number AA59-10026Q, which is needed to activate the VCR menu or switch to the AV-in mode. Apparently, the front panel buttons will do playback features, but nothing else VCR-related.
Because the “timer” light was blinking, I thought it could be some kind of cryptic error code. However, the service manual makes no reference to any front panel lights. I couldn’t find the user manual, either, but I don’t expect it would have that kind of information.
Theory
I’m not sure if modern televisions still have this feature, but a lot of CRTs from this period had “auto-off timers.” The idea was that you’d sit in bed, watch some TV, and set the timer. When the timer expired, the TV would automatically shut itself off so it wouldn’t be running all night after falling asleep in the middle of Letterman’s top 10.
For parents, these timers were also used to limit how much TV your kids were watching – which means the timer value has to persist across the set being turned off, and probably even unplugged. Kids are crafty when they need to get around the computerized babysitter in order to watch the rest of Letterman, for instance. That need for resilience means the set has to have some kind of long-term storage that holds the timer data. I looked around in the schematic, and immediately found an Atmel 24C02 i2c EEPROM connected to the CPU.
My initial guess was that this EEPROM was corrupted somehow – maybe a lightning strike, maybe it hit the write limit, maybe it’s developed forgetfulness out of pure age. If that’s the case, then the fault would manifest this way: the set wakes up, reads the value of the EEPROM, sees that the “remaining time” is something like negative seventeen trillion seconds (which is less than or equal to zero seconds,) and then shuts itself off.
While the TV was on its way, I decided to see how much it would cost if I had to replace the EEPROM. i2c-based EEPROMs tend to be really cheap, because they’re sorta modern, and modern things suck, so nobody wants them. I ended up ordering a 24C02 EEPROM from Digi-Key for $0.70, just to be on the safe side.
Arrival
It took forever to get here, and it wasn’t packed especially well. That’s eBay for you.
I noticed as I was getting it out of the box that it had a weird noise inside, almost like something was rolling around inside the set. That’s not good. I checked the VCR slot to see if I could figure out what it was.
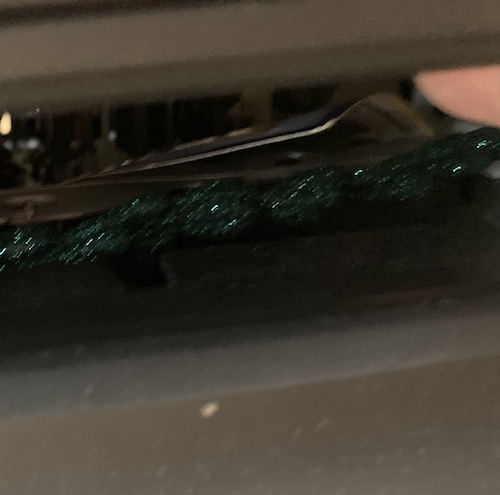
What the hell is that?
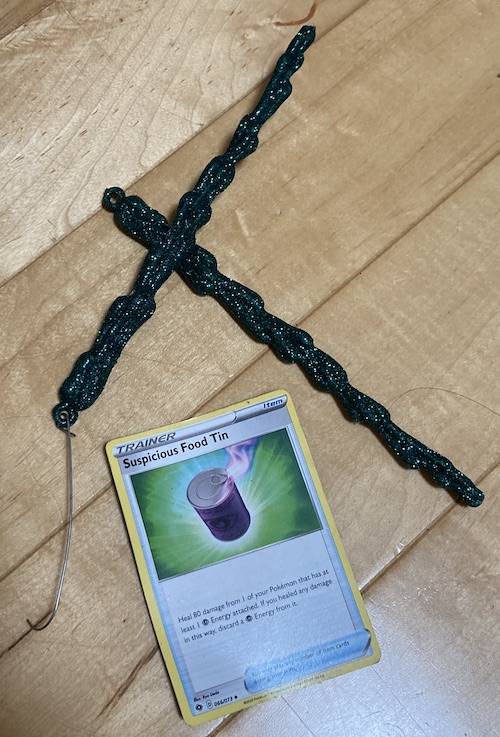
I used some long pliers to get the contents of the VCR out, and found two glittery green fake plastic icicles and a Pokémon card from 2020. Some children have been “working on” this television set. Warms my heart to see that kids are still cramming stuff into VCRs in this day and age.
Keen viewers will notice that there is only one metal hook for two icicles. Uh oh. I could hear something else rattling around in the bottom, too, if I picked up and tilted the set from side to side. The prudent thing would be to take the set completely apart and look for the stray icicle hook made of conductive metal, in case it’s bridging something that shouldn’t be bridged.
So I fired it up instead.
Vroom vroom, let’s go
The convergence between green and blue wasn’t exactly great - there’s lots of fringing and misalignment on the OSD. More on this in a bit. The timer light was indeed blinking.
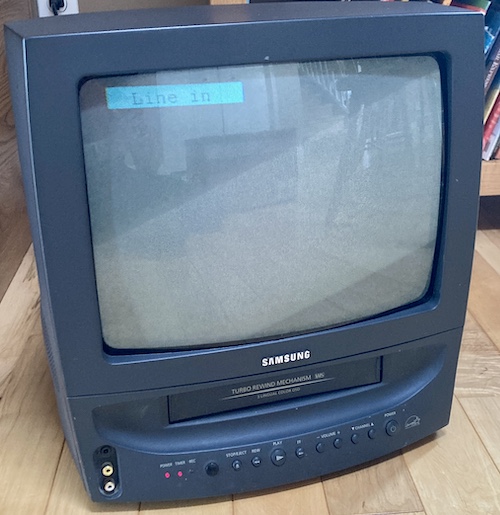
Unlike what the eBay seller said, the TV did not at any point pop up an ominous “0 minutes remaining” message and turn itself off. I sat watching the “Line In” channel for about half an hour while eating my lunch, waiting for a timer-induced failure. Not exactly riveting viewing, but I’ve seen worse.
I grabbed some universal remotes and started tinkering. I came away frustrated on the “TV” settings, with seemingly hundreds of button presses failing to find a code that controlled the TV. Then I remembered - it’s a TV and a VCR. On the “AUX” or “VCR” settings, I could turn the set on and off and access limited menu items, but not all the buttons worked. In particular, the “Mute” button, which is required to access the service menu, does not work on this remote under “VCR;” it always sends a message out through whatever the “TV” setting is programmed to instead.
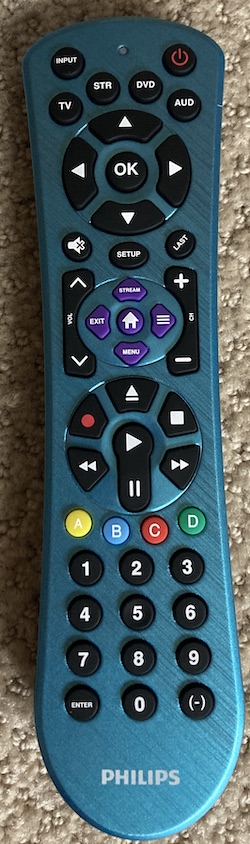
So I bought another universal remote. This fetching blue Philips number cost me twelve dollars.
What’s On The Menu?
While I was waiting for the remote to arrive, I was able to check some menu items using the front panel buttons.
I found some interesting things. For one thing, putting the VCR in “Demonstration” mode popped up a red “Demonstration” OSD, so I knew that the red gun of the CRT worked. I also noticed that the time-of-day clock had reset, which is no surprise since the TV had been unplugged for years.
No timed shut-off or turn-on for the set was set, nor sleep timer, although I did inadvertently schedule a timed recording one or two times. Navigating this menu was really frustrating.
I also noticed that some of the channel tuning settings seemed to have changed over the course of testing. The Add/Remove Channels option couldn’t be toggled with my remote, but I noticed that it changed from Added to Deleted a few minutes later.
Initially, I had suspected EEPROM corruption, and now it was seeming more likely.
Something really interesting happened when I tried to change the time of day clock. If I put it to a year before 2000, it would work as I expected. On the other hand, if I changed it to a year past 2000, each increment would make the set seem to stop “listening” to the remote and front panel for awhile, and the OSD menu would eventually turn itself off. Even the power button wouldn’t work.
Remote Possibilities
I let the set sit for a little while, and the universal remote showed up. As soon as I unpacked it from the box, I looked at the little sheet of device codes that came with it. Sure enough, stuffed into a very tiny corner, was the device category of “TV/VCR Combo Units.”
I tried the first code, and immediately had some success. However, the volume and mute buttons didn’t work, so I tried the second code, 1522, and had even more success. Now the mute button worked, so I could get into the service menu.
To get into the service menu:
- Shut the TV off but leave it plugged in;
- Press Mute, 1, 8, 2, Power
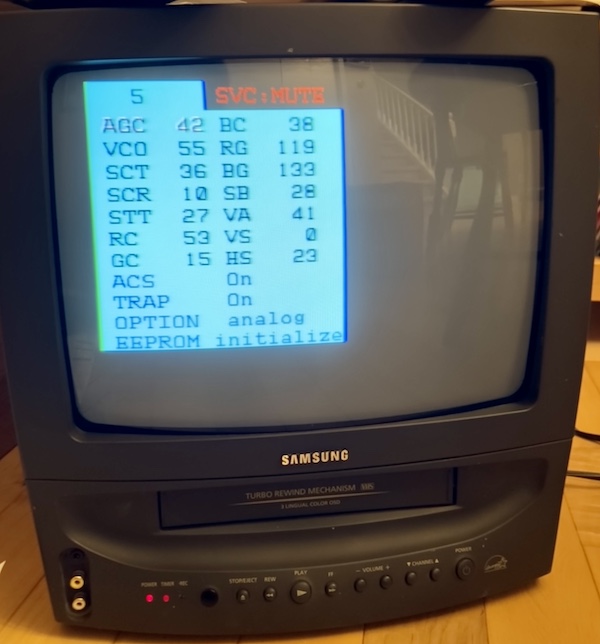
I scrolled down to the “EEPROM Initialize” option and picked it. The set shut off, and along with it… the blinking timer light! There are a lot of other cool options in this menu that I plan to revisit in order to do calibration, although I doubted that the convergence could be controlled through software. This set may be from the far-off future year of 2001, but it isn’t that fancy.
I decided to also check for more details on the back label of the TV at this point, to track down the service manual. The “SVC Mod.” is CXJ1352BX/XAC, the chassis number is V15A, and it was made in Tijuana. While combing through the service manual, I found that this set has RGB pins getting fed by an extrenal OSD1, so it should be fairly easy to cut in the middle of these and do an RGB mod as well. Some sets generate the OSD inside the jungle IC, so there is nowhere to tap in order to inject RGB into the set.
I believe this easy RGB mod is also the case with a lot of Samsung sets from this era.

According to the service manual, here’s what each of these cryptic acronyms mean:
| Cryptic acronym | Somewhat cryptic name |
|---|---|
| AGC | RF AGC adjustment (gain control) |
| VCO | PIF VCO adjustment (something-P I/F voltage controlled oscillator, composite related?) |
| SCT | Sub-contrast adjustment |
| SCR | Sub-colour adjustment |
| STT | Sub-tint adjustment |
| RC | Red cut-off |
| GC | Green cut-off |
| BC | Blue cut-off |
| GG | Green gain |
| BG | Blue gain |
| SB | Sub-brightness adjustment |
| VA | Vertical size |
| VS | Vertical centre |
| HS | Horizontal phase |
| AFN | ??? |
| ACS/VChip | ??? censorship chip disable? |
| TRAP | 3.57MHz switch (???) |
| OPTION | AFT adjustment (???) |
| EEPROM | EEPROM initialize |
No convergence adjustment.
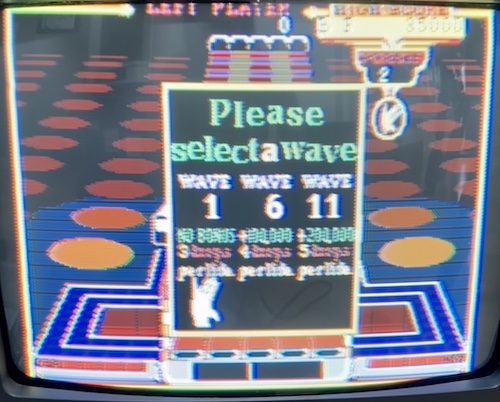
PC Engine
Because it was on top of the pile, I grabbed my Core Grafx and plugged it into the TV. I was immediately rewarded with some atrocious convergence around the circumference of the screen:

Sadly, convergence is not something that is easily adjustable in software on most (all?) sets, this one included. I assume I have to go and wiggle some yokes, which is something I’ve never done before and don’t want to do solo. For now, I will just sit further back from the set, and maybe take my glasses off!
Klax was legible, but not beautiful, in this condition. The top of the screen is getting cut off, so I probably need to take a visit to the “vertical size” adjustment (VA) in the service menu.
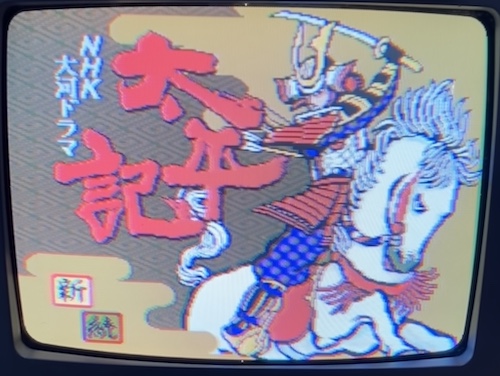
NHK Taiga Drama Taiheki, a turn-based strategy game based on the then-popular Taiheki drama series, has a really nice static title screen, so I wanted to use it to see if sharp detail could be discerned. To my surprise, this looked quite good, albeit with the usual flickering fringes from the PC Engine’s famous dynamic dithering.
Soak Test
Now that I knew the TV was working, it was time for a soak test, to make sure that the timer fault and random shutdowns didn’t re-occur. The last thing I would want to do is haul it to a meet and then have to keep resetting it, or have no display at all. In keeping with my tradition of not playing videogames for very long, I decided it was time to watch a movie.
Being in the modern era, I wanted to hook it up to some kind of streaming service, but I didn’t have any streaming devices that did composite output. Netflix is built into my TCL television set, and my PS3, Xbox One, and PS4 are all HDMI sources. My Xbox 360 does component, but that didn’t help me much with this set, which doesn’t even have stereo sound.
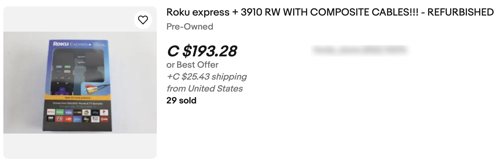
The only solution was to buy a streaming box of some kind. Somehow I’ve managed to avoid it this long. I decided to try and get a Roku Express, but the last supported version of that device that has composite (model number 3910) has been marked up to insane prices on eBay:
Even the HDMI ones were fairly expensive. I checked for Apple TVs as a joke, thinking that there was no way the fruit company would have anything cheaper than an Android TV box, but I was wrong. I got this A1427 (3rd generation) Apple TV for literally 99 cents on eBay instead. It even came with an HDMI cable and a fresh battery in the remote.
Of course, it needed to be converted from HDMI, so I recruited the help of my good friend, $4.14 HDMI-to-AV-box-from-AliExpress. These things have gone up in price, as I remember them being below three dollars before. That’s inflation for you.
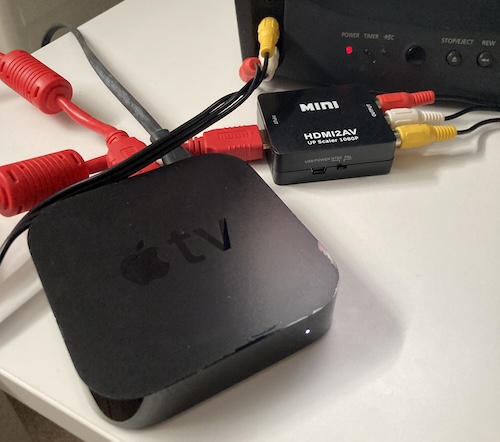
Even though the HDMI-to-AV box has a USB port for power, it can be powered through HDMI if the source device chooses to do so. The AppleTV is one such device: it even powers this box when it’s asleep, causing it to display this test pattern of colour bars.

The convergence problems are obvious even on this screen: not only is the text wiggling, but there is a dramatic band of green in between the yellow and teal bars on the left, and another band between magenta, red, and blue each.
After a bunch of thumbing-in passwords using the remote, I was now on the Apple TV main menu. Text is barely legible on this thing, not just because of the convergence issues (which are glaring,) but because the user interface expects to be shown in a high-resolution mode like 720p at the very least.
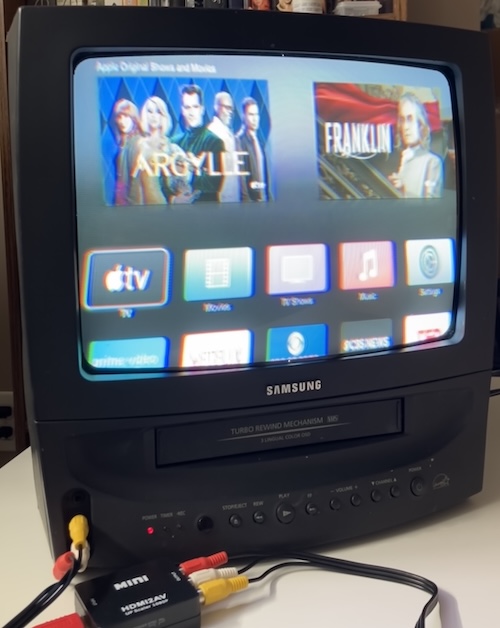
Some more thumbing-in and I was able to watch Netflix2. The Lost World has never looked more VHS-y.
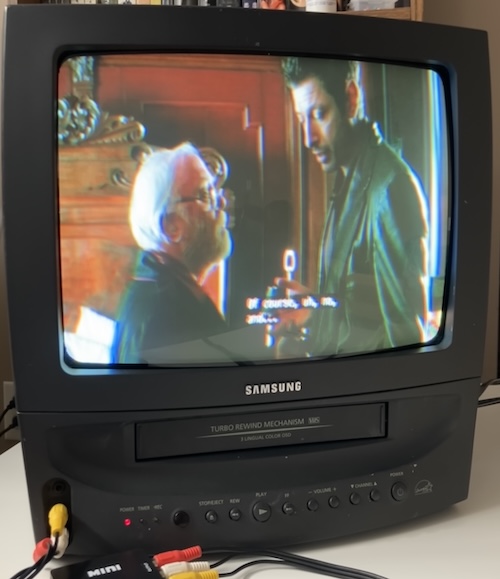
Trust me that it looks a little better in person, but only a little better. Long Exposure mode on my phone is not my friend here. I’ll have to improve my technique if I want to keep taking pictures of CRTs…
Okay, Seriously
There’s no way that I was happy with the performance of this set. Even though it ran for hours without dying, the picture was totally awful.
Now, I’m no CRT expert. I barely know how to turn a knob. But I do know what I like, and I don’t like what’s going on here.
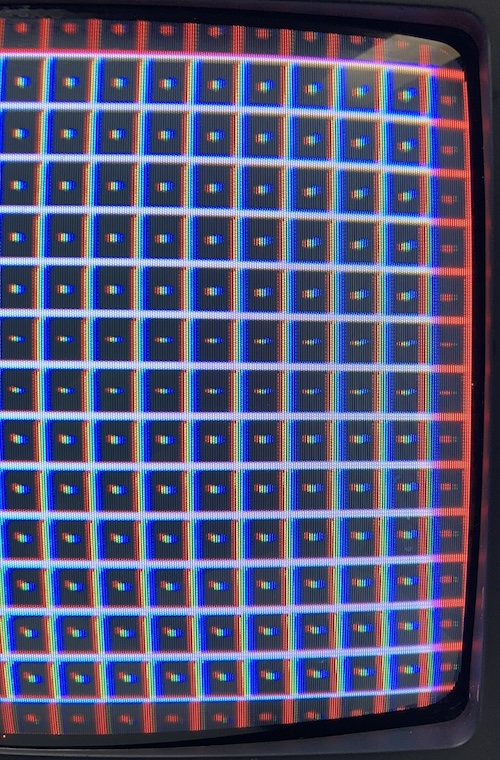
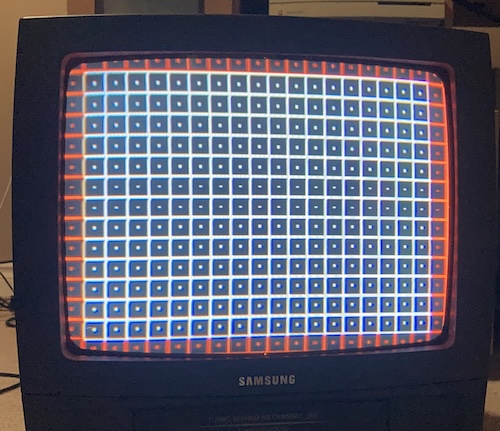
To figure out what areas to focus on, I used my Model 1 Genesis with a Test Cartridge over composite. The Test Cartridge comes with several of the 240p Test Suite test screens, including what it calls the “overscan test,” which puts an evenly-spaced grid of boxes onto the screen.
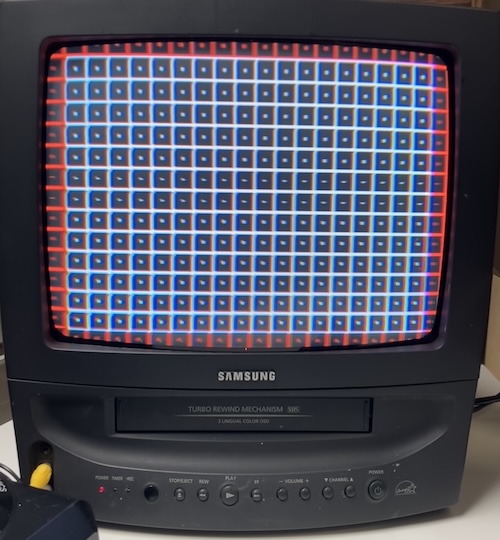
Already, this does not look great. A closer inspection of the left side shows convergence issues, as the white boxes have red and green lines bleeding out of them. There’s also some concerning geometry issues in the corners, as the white boxes are also not really boxes, but more resemble a house falling over.

On the right side, the linearity problem maybe gets a little better, but the convergence problem gets even worse, with green not even in the same postal code as the rest of the channels near the right edge.
Although the convergence is really distracting, that flagging in the corners on the left side of the picture really bothered me. It started to feel like it could be a power supply issue, and it’s possible that the convergence was being made worse by weak focus as well – those corners are kinda blurry.
Weird clunking sound
Of course, all of this non-functionality didn’t keep me from using the set. Whenever I needed a not-particularly-valuable CRT to run for a long time at a club meeting, I pulled this sucker out. Of course, that required transporting the tube, and every time I did that I heard some faint clunks inside.
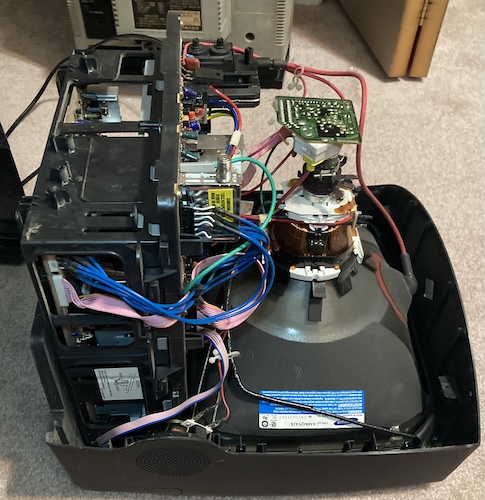
Time to take it apart. I put the TV on the floor next to some other TVs that also needed work, because my desk was being occupied by TVs that need work. I may have a problem.
Opening this set is easy, with just a handful of screws on the back. Someone has been in here before, judging from the fact that most of the case plastic is cross-threaded and in terrible shape.
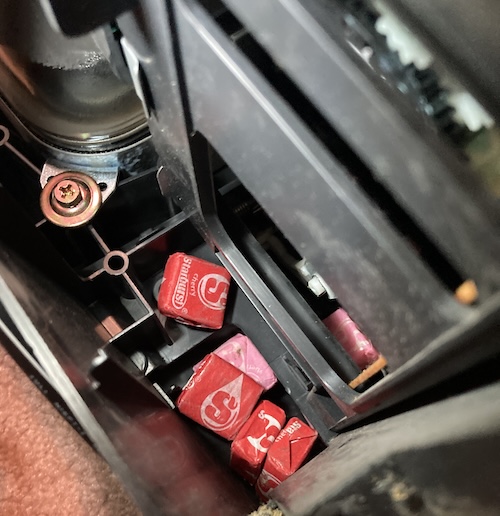
Given the fact that there were some Christmas ornaments inside the VCR, I should not have been surprised that there were also some decades-old Starburst candy. Hey, they say that solar flares mess with RF, maybe removing these starbursts will touch up the convergence?
I pulled a total of seven candies out of this thing. That’s like a third of a package. Kids are so wasteful. This took me about an hour to get all of them fished out of the VCR’s many folds and gewgaws.
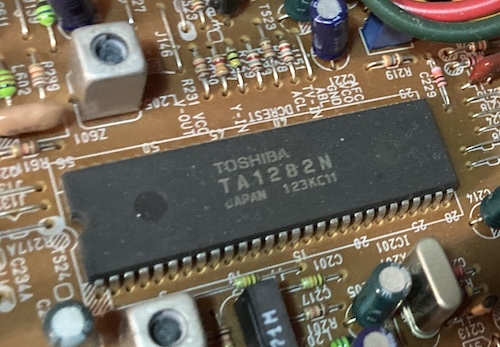
After cleaning up around the set, I decided to take a look at what chips are onboard. Here’s the Toshiba TA1282N all-in-one 52-pin jungle IC. This thing does it all, from OSD to deflection control. As I mentioned up above, it also has some obvious RGB inputs on pins 15-17, which could be very interesting for us later.
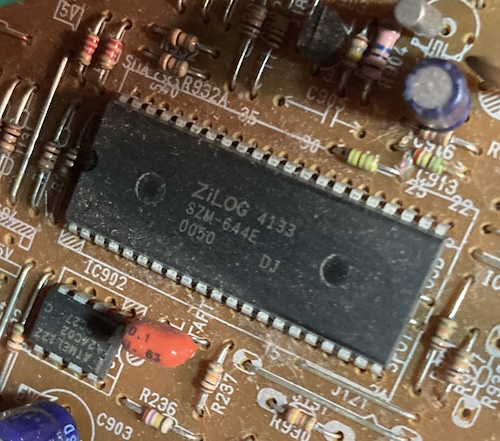
Since this is a television set from The Future, there are very few other “big” parts on the motherboard. Here’s another one: a Zilog SZM-644E, which is almost certainly a mask-ROM microcontroller. This chip is also probably where the OSD comes from, since there’s hardly anyone else living on this board.
Unfortunately, I was not able to find a data sheet (let me know if you do!) Right next to this MCU is the aforementioned small Atmel 24C02 i2c EEPROM, the one which we have decided that we don’t have to replace right now.
After buttoning up the set and doing literally no adjustment, measurement, or even eyeballing of caps, I made sure that it still worked by playing some Soggy-1000 games on it. It’s amazing how bright this tube still is, considering the hours it must have seen.
Okay, in the van with you.
A Fortuitous Alignment
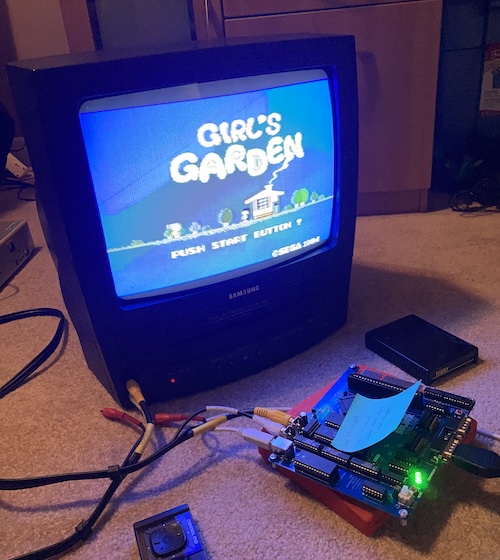
Now that the set was working, I hauled it to a show in order to brag about my SG-1000 clone. As one does.

When I was showing this pile of junk at a local show, our local CRT mechanic Baptiste was also visiting. I asked him if he would take a look at the convergence on the Samsung, and after he saw how bad it was, he obliged. Because I was too dumb to bring a copy of 240p Test Suite with me, we instead had to do it by making SK-1100 BASIC repeatedly write a . character with white-on-black text (COLOR 15,2; 10 PRINT "."; 20 GOTO 10), but it was enough to work.
After a couple minutes fiddling, it looked way better. He told me that it probably needed additional convergence strips (fancy tape-on magnets3) to get it perfect, and that the top left of the set needed an external degauss to be tolerable. You can see that interference on all-blue pictures, but that’s pretty rare for me.
Still, it looked pretty good to me, and I thanked him profusely for his time and magic fingers.
Thank you again Baptiste!
Conclusion
That’s probably enough posting about this dumb cheap TV/VCR for now. Despite a rocky start, I have grown to like this little set, and I’ve been carting it to shows just as I intended. Would it be nice to have 15kHz RGB? Oh yes, but that can wait until later.
Does anyone have a tape they won’t miss that I can try the VCR with? I’m pretty sure I got all the melted Starburst out of it…
Repair Summary
| Fault | Remedy | Caveats |
|---|---|---|
| TV timer light blinking, shuts itself off | Get into service menu and initialize EEPROM | Shutting off phenomenon was not reproduced during initial testing |
| Weird clunking sound inside set | Remove candy from VCR | I never found that Christmas ornament hook, did I? |
| Convergence is off | Adjust convergence rings | For better quality, will require external convergence strips |
-
On Screen Display, basically the channel indicators, menu, etc. Everything that’s overlaid on top of the program by the television’s microcontroller. ↩
-
While I was editing this article, Netflix made sure to email me and say that the AppleTV I used will soon not work with their service. We had a great time together while it lasted, Jeff Goldblum. ↩
-
It looks like these are straightforward enough to make myself, but I probably won’t do so at this time. ↩